IOC容器
依赖注入
构造器注入
set方式注入⭐
- 依赖:bean对象的创建依赖于容器
- 注入:bean中的所有属性,由容器注入
拓展方式注入
p命名
c命名
注意点⚠️:需要去官网引入xml约束
bean的作用域
官方介绍
| Scope | Description |
|---|---|
| singleton 单例模式 | (Default) Scopes a single bean definition to a single object instance for each Spring IoC container. |
| prototype | Scopes a single bean definition to any number of object instances. |
| request | Scopes a single bean definition to the lifecycle of a single HTTP request. That is, each HTTP request has its own instance of a bean created off the back of a single bean definition. Only valid in the context of a web-aware Spring ApplicationContext. |
| session | Scopes a single bean definition to the lifecycle of an HTTP Session. Only valid in the context of a web-aware Spring ApplicationContext. |
| application | Scopes a single bean definition to the lifecycle of a ServletContext. Only valid in the context of a web-aware Spring ApplicationContext. |
| websocket | Scopes a single bean definition to the lifecycle of a WebSocket. Only valid in the context of a web-aware Spring ApplicationContext. |
单例模式(Spring默认实现)
原型模式
每次从容器中get时,都会产生一个新的对象
其余几个在web开发中使用
bean的自动装配
- 自动装配是spring满足bean依赖的一种实现
- Spring会在上下文中寻找,并且给bean装配属性
三种装配方式:
- xml中配置
- 在java中显式配置
- 隐式自动装配⭐
autowire:
- byName
- byType
小结:
- byName时需要保证所用bean的id唯一,并且这个bean需要和自动注入的属性的set方法的值一致
- byType时需要保证所用bean的type唯一,并且这个bean需要和自动注入的属性类型一致
使用注解
The introduction of annotation-based configuration raised the question of whether this approach is “better” than XML. The short answer is “it depends.”
使用注解的xml支持
1 |
|
@Autowired:自动装配,通过类型,名字
如果Autowired不能唯一自动装配上属性,则需要通过@Qualifier(value = “xxx”)
@Nullable:字段标记了这个注解,说明这个字段可以为null
@Resource:自动装配,通过名字,类型
@Autowired和@Resource的区别:
同
- 都是用来自动装配的,都可以放在属性字段上
异
- @Autowired通过bytype方式实现,而且必须要求该对象存在
- @Resource默认通过byname方式实现,如果找不到名字,则通过bytype方式实现,如果都找不到,则会报错
使用注解开发
bean
属性如何注入
衍生的注解
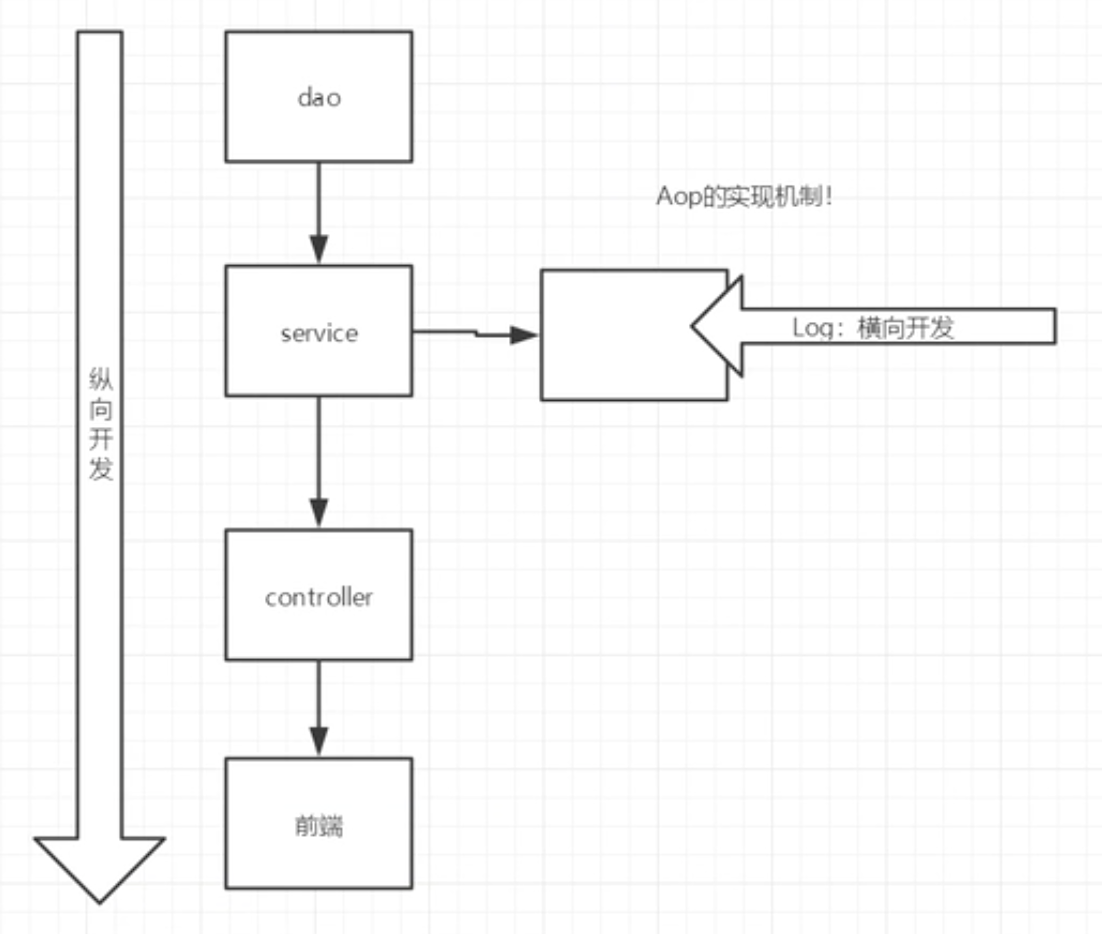
@Component有几个衍生注解,在web开发中,会采用mvc三层架构
- dao【@Repository】
- service【@Service】
- controller【@Controller】
这四个注解功能都是一样的,都代表着将某个类注册到Spring中,装配Bean
自动装配
作用域
- @Component:组件,说明该类被Spring管理了
使用Java的方式配置Spring
Spring xml --> Java
纯Java配置方式,在Springboot中随处可见
10、代理模式
为什么要学习代理模式?因为这就是Spring AOP的底层实现
代理模式的分类:
- 静态代理
- 动态代理
代理模式示意图
10.1、静态代理
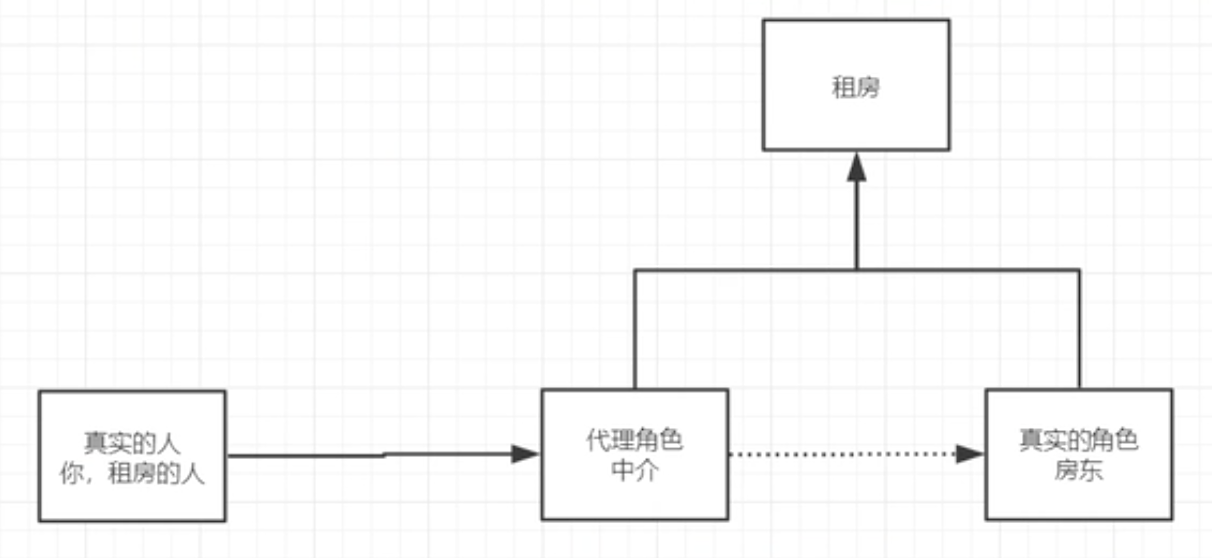
角色分析:
- 抽象角色:一般会使用接口或者抽象类来解决
- 真实角色:被代理的角色
- 代理角色:代理真实觉得,代理真实角色后,我们一般会做一些附属操作
- 客户:访问代理角色的对象
代码步骤:
- 接口
- 真实角色
- 代理角色
- 客户端访问
代理模式的好处:
- 可以使真实角色的操作更加纯粹,不用去关注一些公共的业务
- 公共业务交给代理角色,实现了业务的分工
- 公共业务发生扩展时,方便集中管理
缺点:
- 一个真实角色,就会产生一个代理角色;代码量会翻倍,开发效率降低
10.2、加深理解
10.3、动态代理
- 动态代理和静态代理角色一样
- 动态代理的代理类时动态生成的,不是我们直接写好的
- 动态代理分为两大类:
- 基于接口的动态代理—JDK动态代理
- 基于类的动态代理—cglib
- java字节码实现;javasist
需要了解两个类:proxy:代理,InvocationHandler:调用处理程序
动态代理的好处:
- (静态代理的好处全都有)
- 一个动态代理类代理的是一个接口,一般就是对应的一类业务
- 一个动态代理类可以代理多个类,只要是实现了同一个接口即可